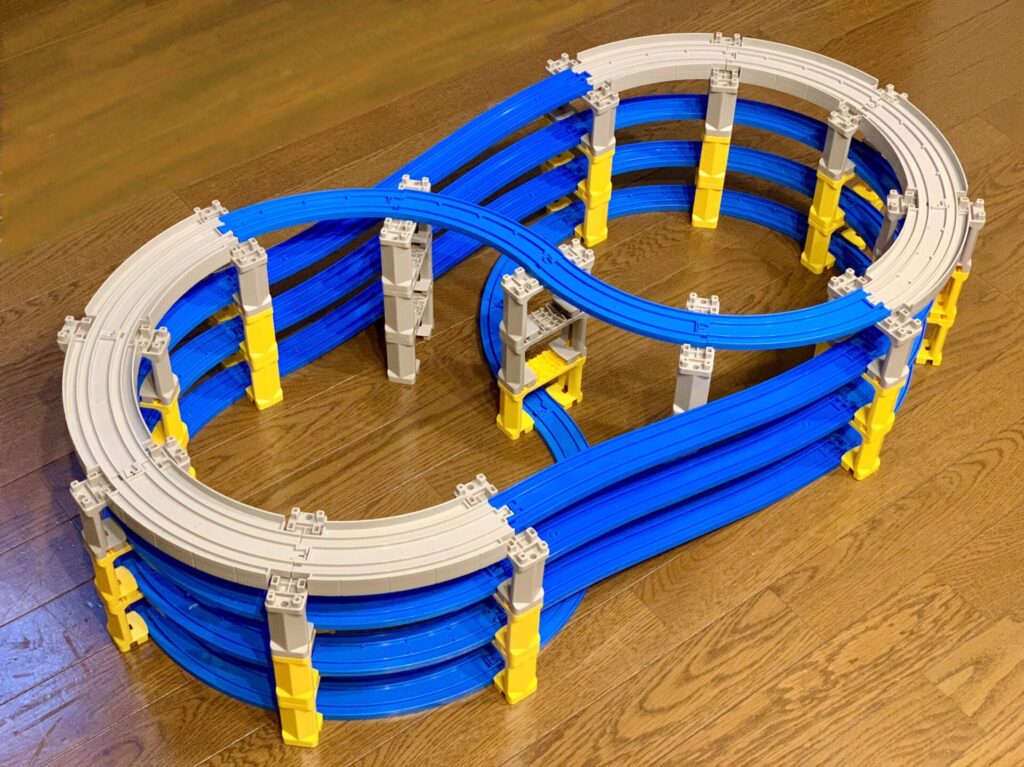
ぐるぐるタワーA (Spiral Tower A)
曲線レール、坂レール、ブロック橋脚だけでつくる、シンプルできれいなタワーです。
Simple and beautiful tower made only with curve rails, slope rails, and pier blocks.
| 使用したパーツ Parts | 個数 Quantity |
|---|---|
| 曲線レール Curve rail | 40 |
| ニュー坂レール Slope rail | 6 |
| ブロック橋脚 Pier block | 39 |
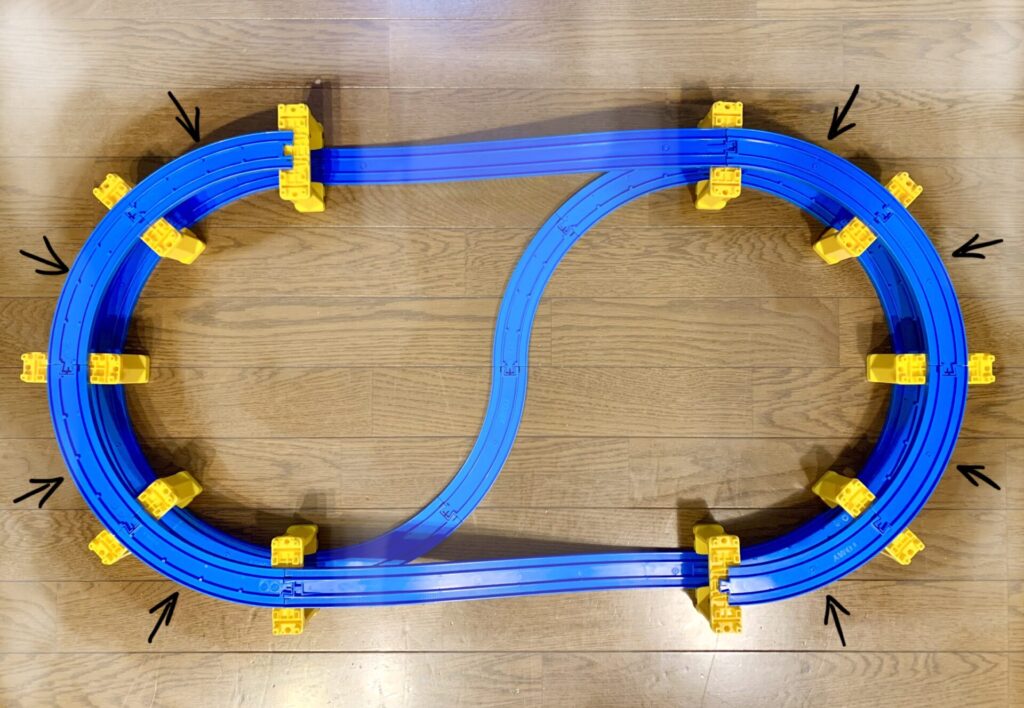
このレイアウトでは曲線レール(R-03)をたくさん使います。
2倍曲線レール(R-21)や高架曲線レール(R-27)を持っていれば曲線レールの代わりに使えるので、曲線レールが足りない分は工夫してやりくりします。
上の図では、曲線レールが足りなかったので最上階に高架曲線レールを使っています。
This track layout requires a lot of curve rails (R-03).
If you have 2x curve rail (R-21) and/or elevated curve rail (R-27), those may substitute for curve rails.
In the picture above, we used elevated curve rail on the top as we didn’t have sufficient amount of curve rails.
ニュー坂レール(R-06)は代わりがききません。ここでは3セット6本を使っていますが、持っている坂レールの数にあわせて高さを変えてつくりましょう。
Slope rail (R-06) cannot be replaced with any other rails. Three sets (6 pcs) of slope rails are used in this article. Decrease/increase the number of layers according to the number of slope rails you have.
複線曲線レール(R-05)や複線ブロック橋脚(J-22)を持っていれば、1階を複線にしてグレードアップすることができます。また、その分曲線レールやブロック橋脚を節約できます。
この記事のさいごにつくりかたがありますので、ぜひそちらも見てみてください。
The ground level track may be upgraded by using double track curve rails (R-05) and double track pier blocks (J-22). It also helps to save curve rails and pier blocks.
See the bottom of this article to build the track with double track rails.
つくりかた (How to build)
Step 1
1階部分のレイアウトを組み立てます。
曲線レールをS字に12本つなぎます。
Build the ground level track by connecting 12 curve rails in S shape.
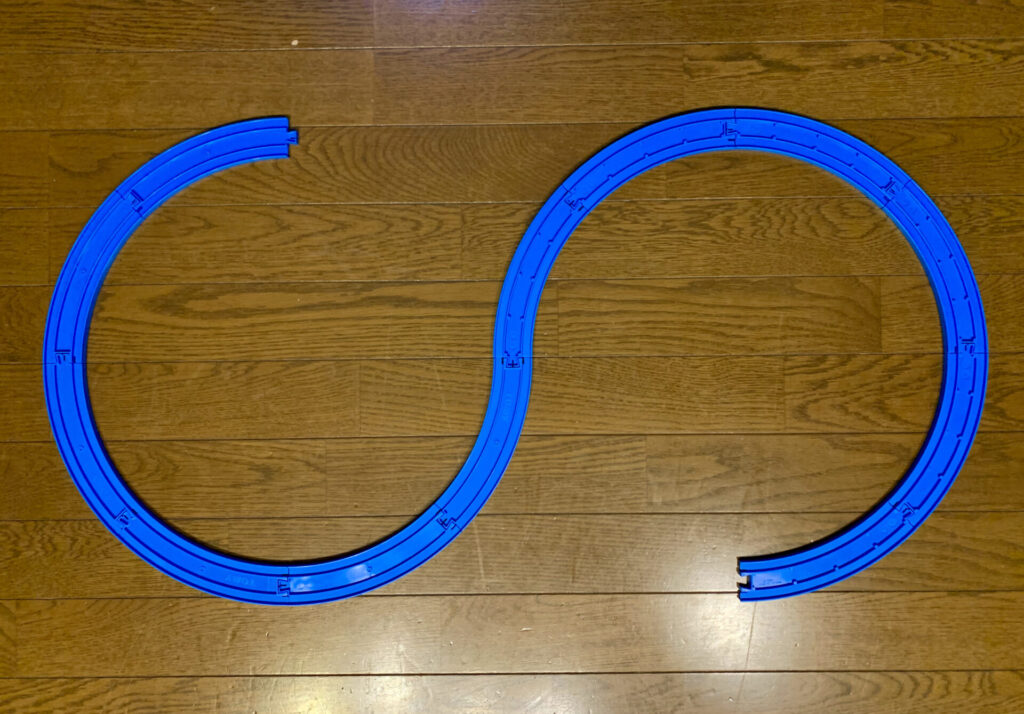
Whichever direction of the rail joint is okay.
Step 2
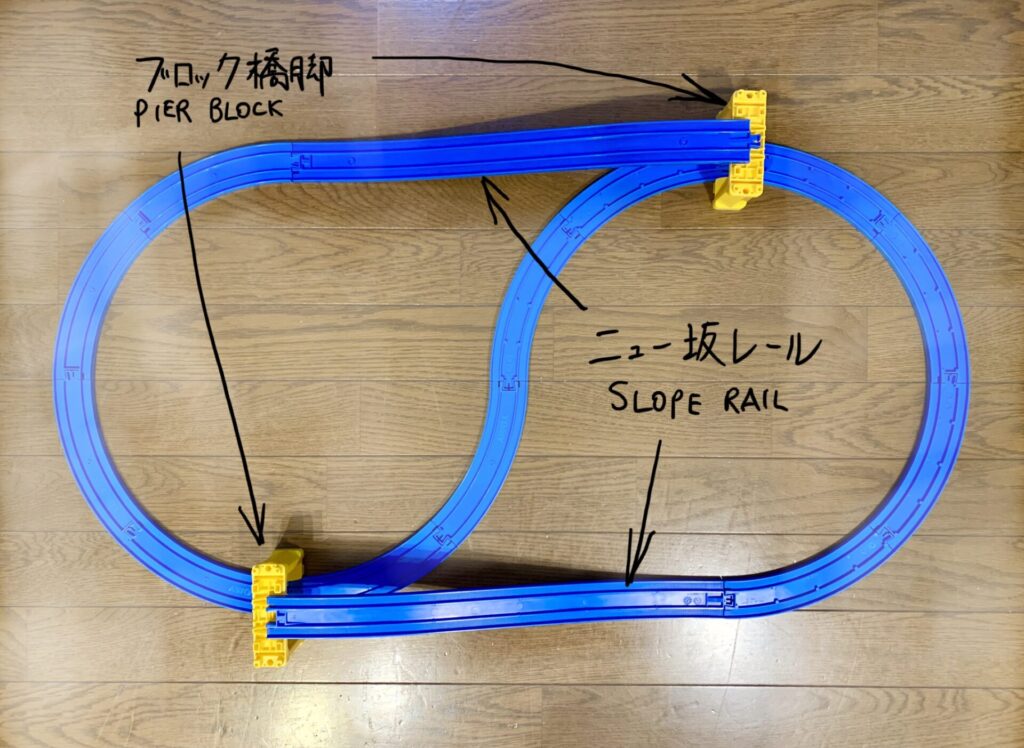
坂レールをつなげます。
Connect slope rails.
Step 3
ブロック橋脚を置いていきましょう。
Place pier blocks.
Step 4
2階部分に曲線レールをつないでいきます。
Connect curve rails on the 2nd level.
Step 5
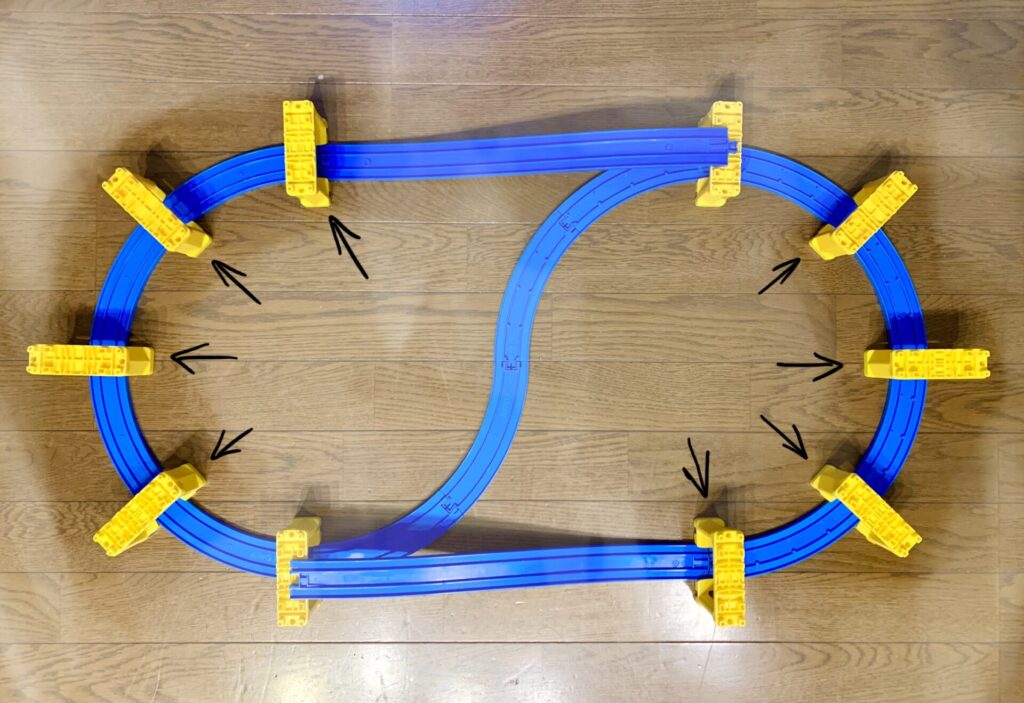
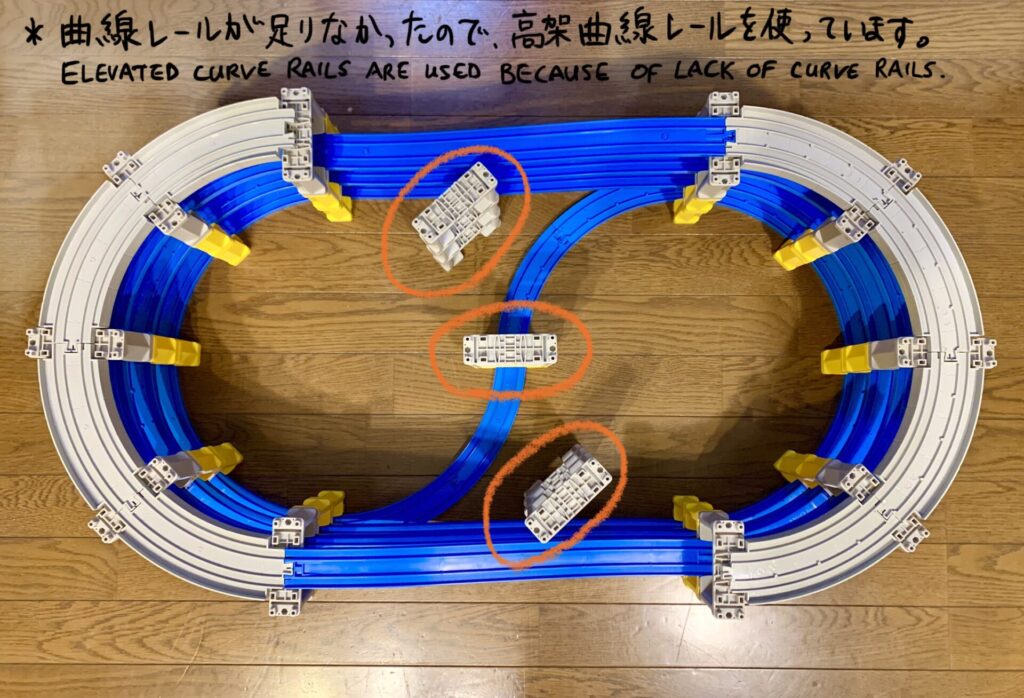
Step 2~4とおなじようにぐるぐるタワーを重ねていき、だいだい色の○の場所に重ねた橋脚を置きます。
Repeat steps 2~4 to pile up the spiral and place stacked pier blocks at orange circles.
Step 6
曲線レールをS字につなぎます。
Connect the ends of the track in S shape by curve rails.
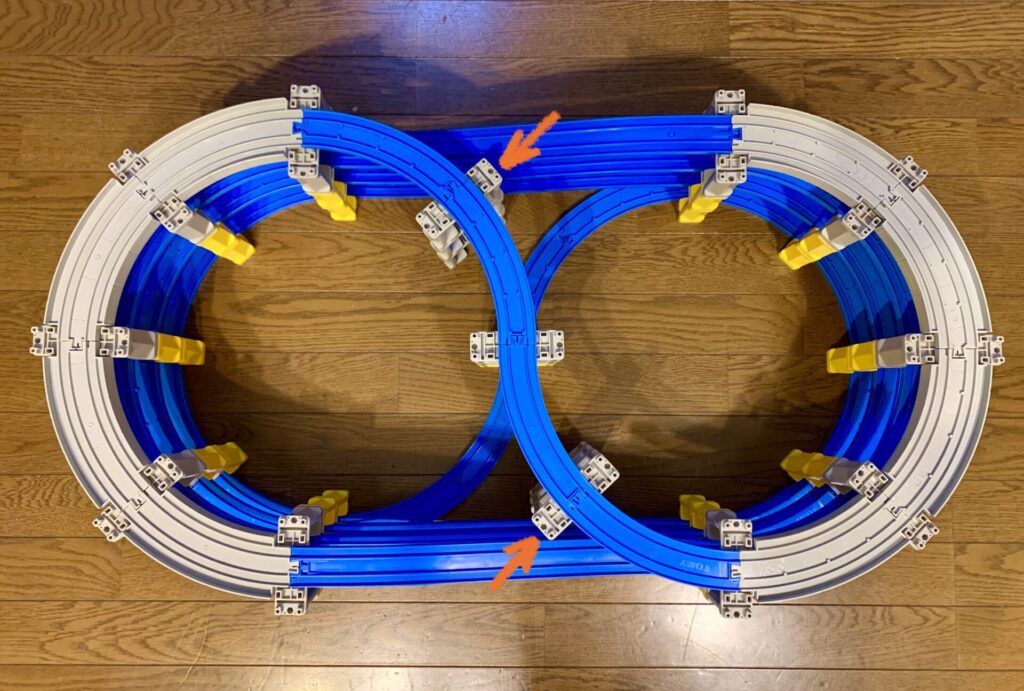
また、上の図の矢印のところの橋脚は、坂レールから少し離れるようにわざとずらします。
こうすることで、坂レールを走る列車がブロック橋脚の出っぱりにぶつからないようにします。
Also, the pier blocks indicated by orange arrows above should be slightly offset away from the slope rails.
It prevents a train from crashing into the corner of the pier blocks.
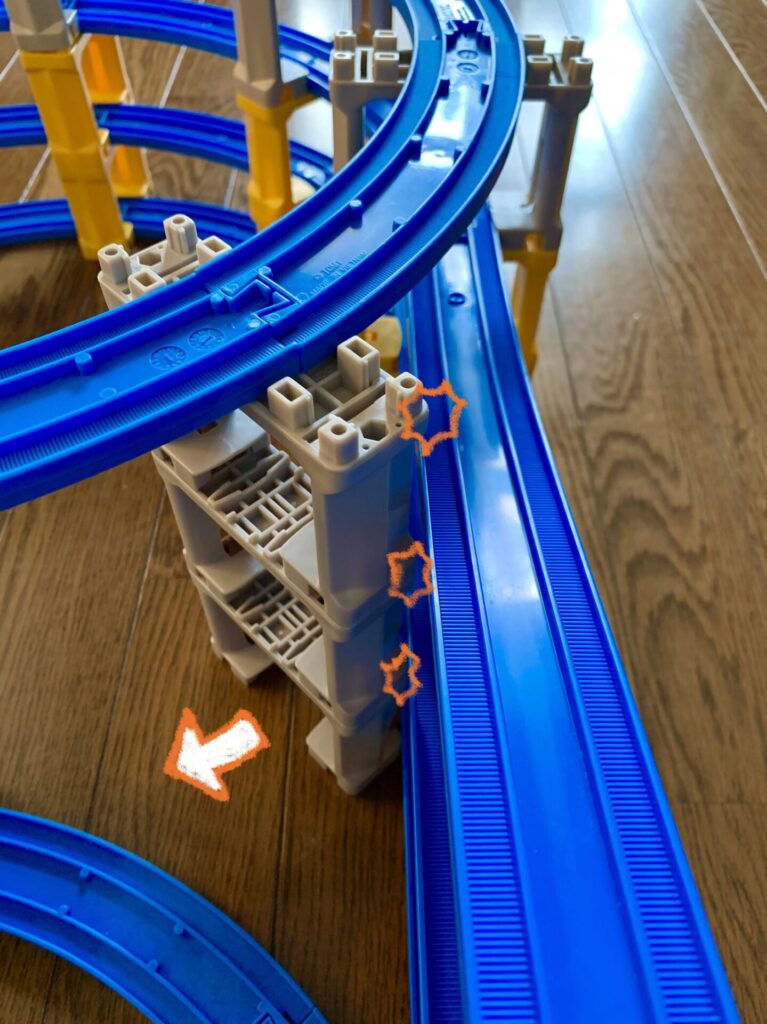
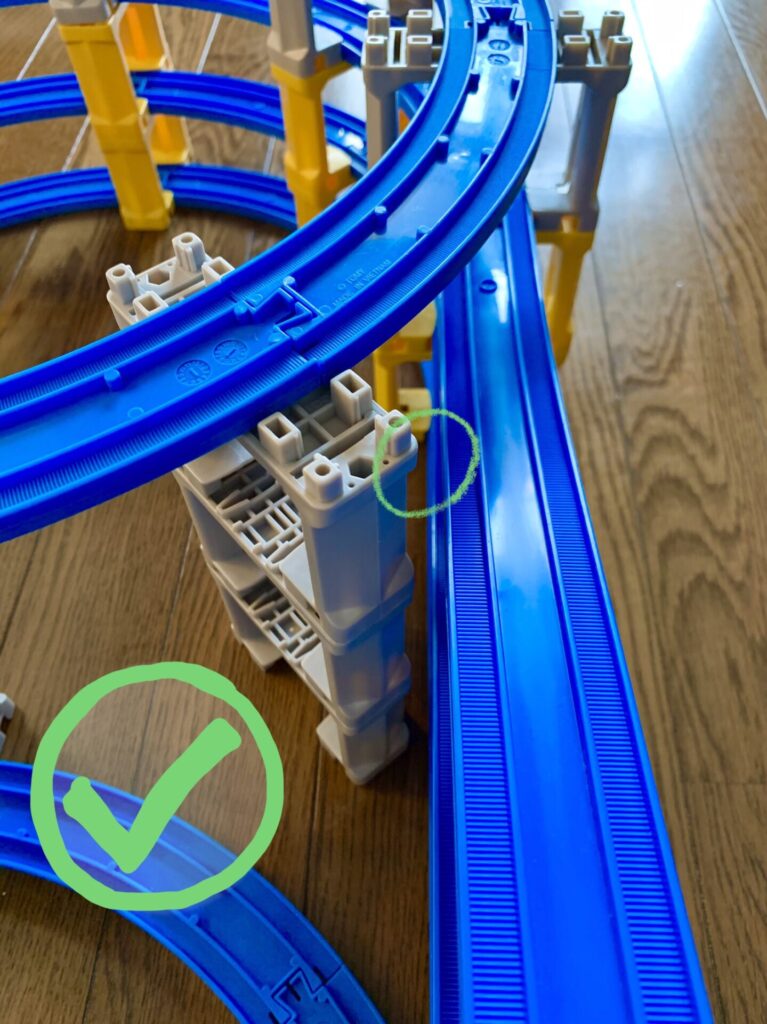
2倍曲線レールがあればここに使いましょう。
ブロック橋脚を坂レールからしっかり離すことができます。
If you have 2x curve rails, use those here for the best spacing.
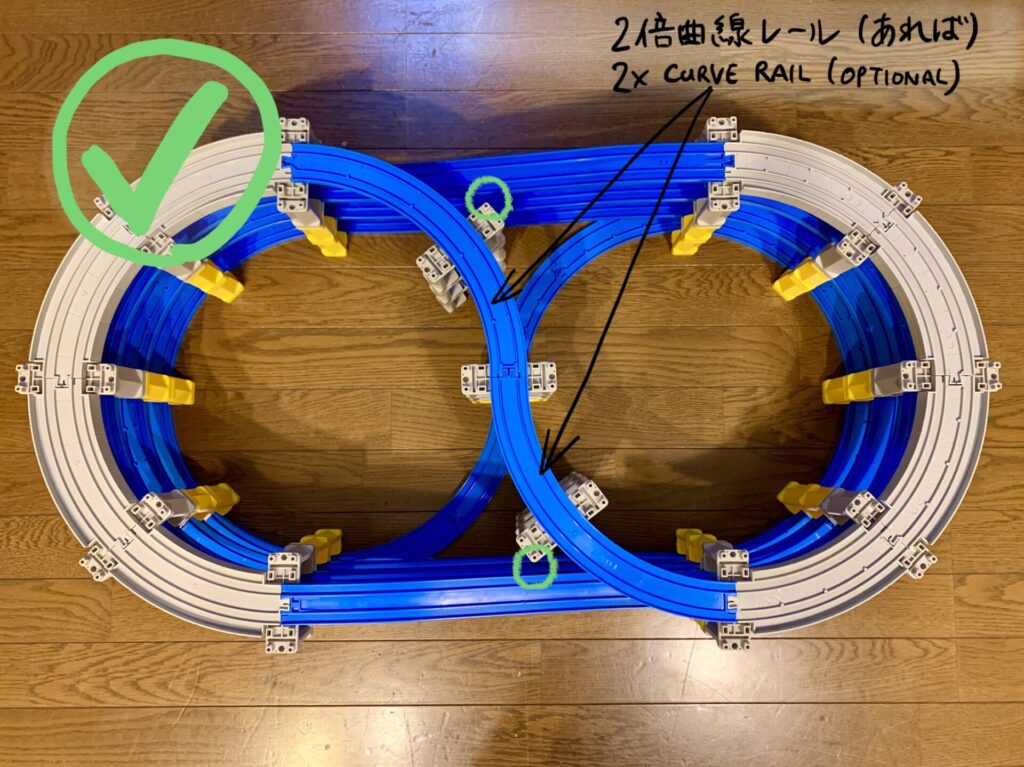
The pier blocks may not be omitted.
タワーをぐるぐる登り下りするレイアウトが完成しました。
It’s all done! Run your train going up and down.
続いて、複線レールの使いかたです。
Below shows how to install double track rails to the tower.
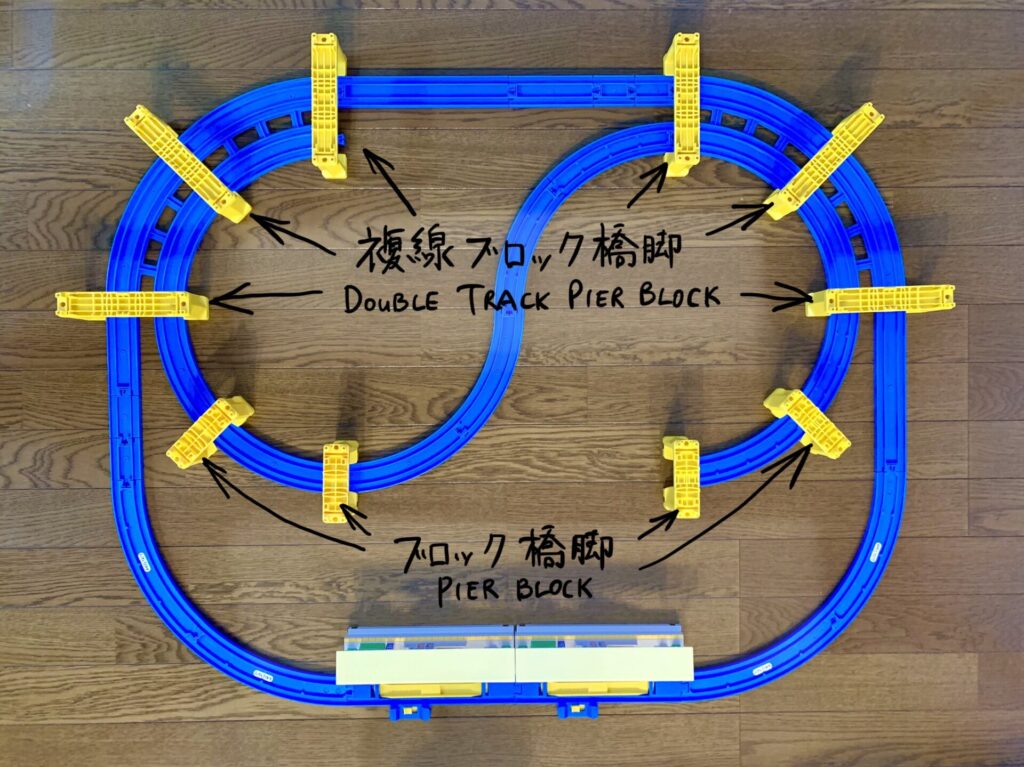
複線レールと複線ブロック橋脚を使う (To use double track rails)
複線曲線レール(R-05)や複線ブロック橋脚(J-22)を持っていれば、1階のレイアウトを複線にしてしまいましょう。
レイアウトがカッコよくなりますし、1階で曲線レールやブロック橋脚をたくさん使わなくてすみます。
If you have double track curve rail (R-05) and double track pier block (J-22), let’s make the ground level double track.
It will be even better as well as you will save curve rails and pier blocks on the ground level.
レイアウトその1 (Option 1)
複線曲線レールと複線ブロック橋脚を2セットずつ持っているとできます。
This option is available if you have 2 sets of each double track curve rail and double track pier block.
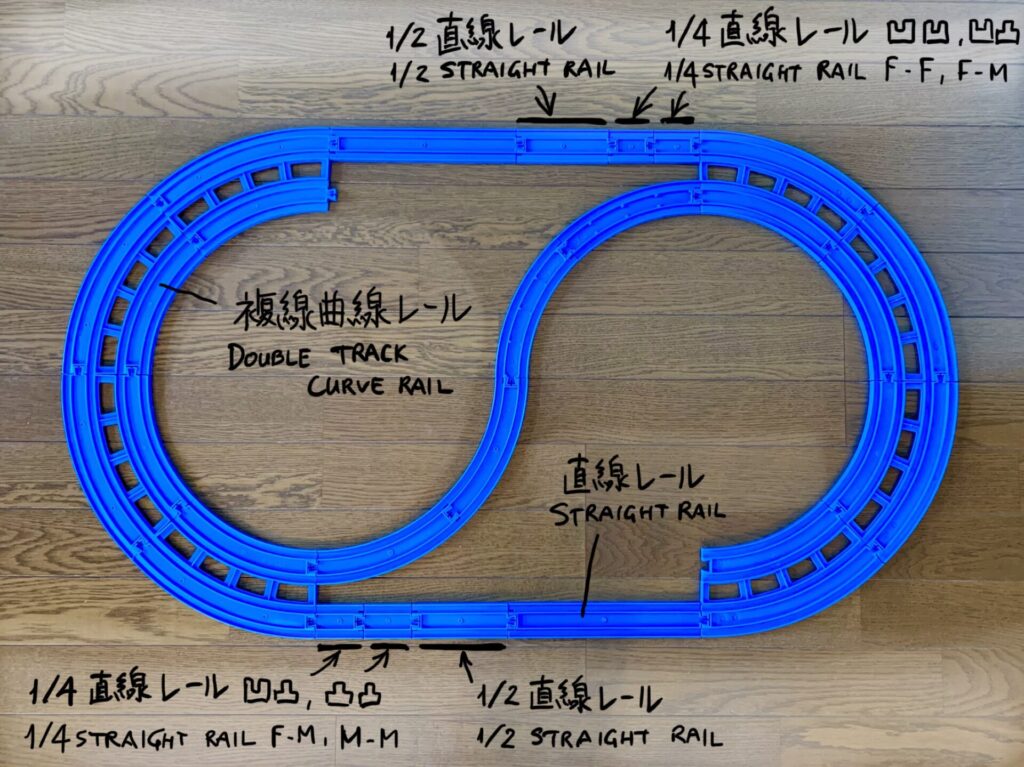
Use 1/4 straight rails to adjust the rail joint.
Proceed with Step 4 and on above.
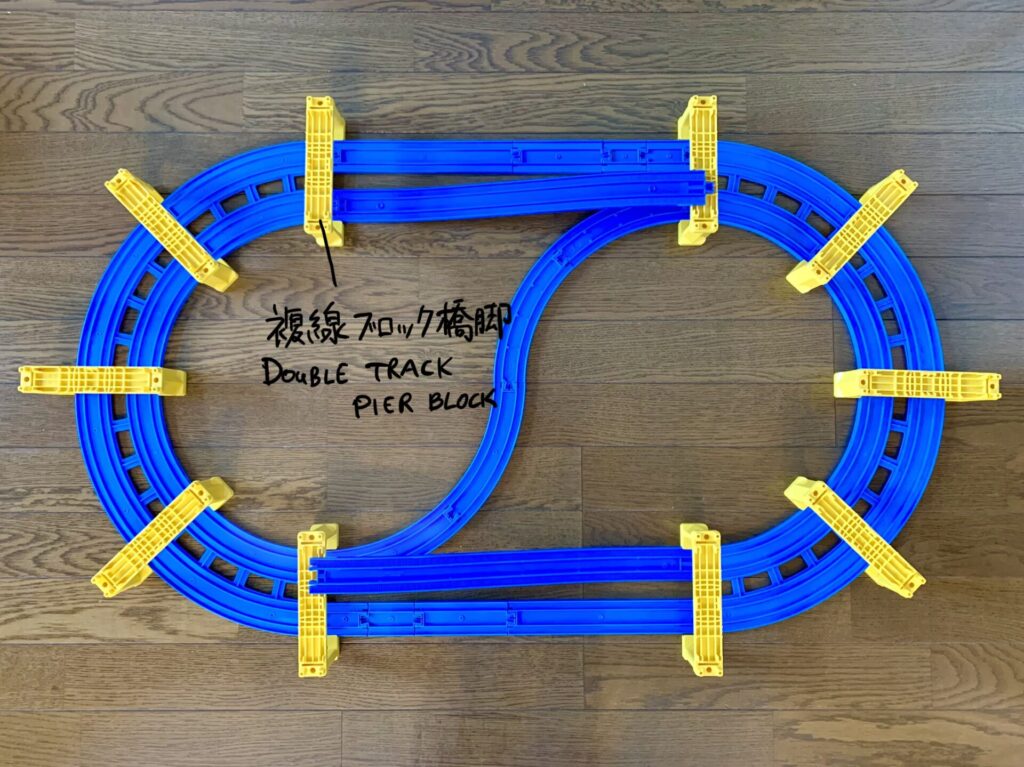
レイアウトその2 (Option 2)
複線曲線レール(R-05)、複線ブロック橋脚(J-22)、複線外側曲線レール(R-09)が 1セットずつあるとできます。
This option is available if you have 1 set of each double track curve rail, double track pier block, and double track outer curve rail.
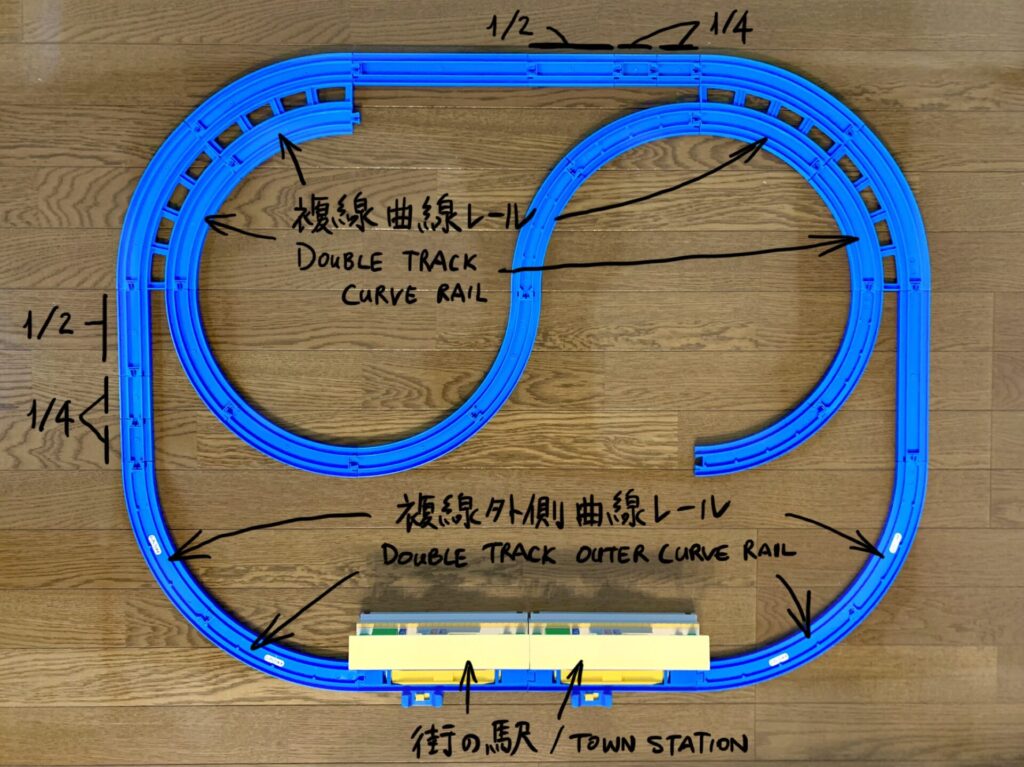
For town stations, other station, railroad crossing and/or straight rail may substitute.
Follow the instructions above from this point.
複線レールを使ったときの仕上がり (Overall layout with double track)
1階を複線にするとこんな感じになります。
It looks as the following picture when double track rails are used on the ground level.
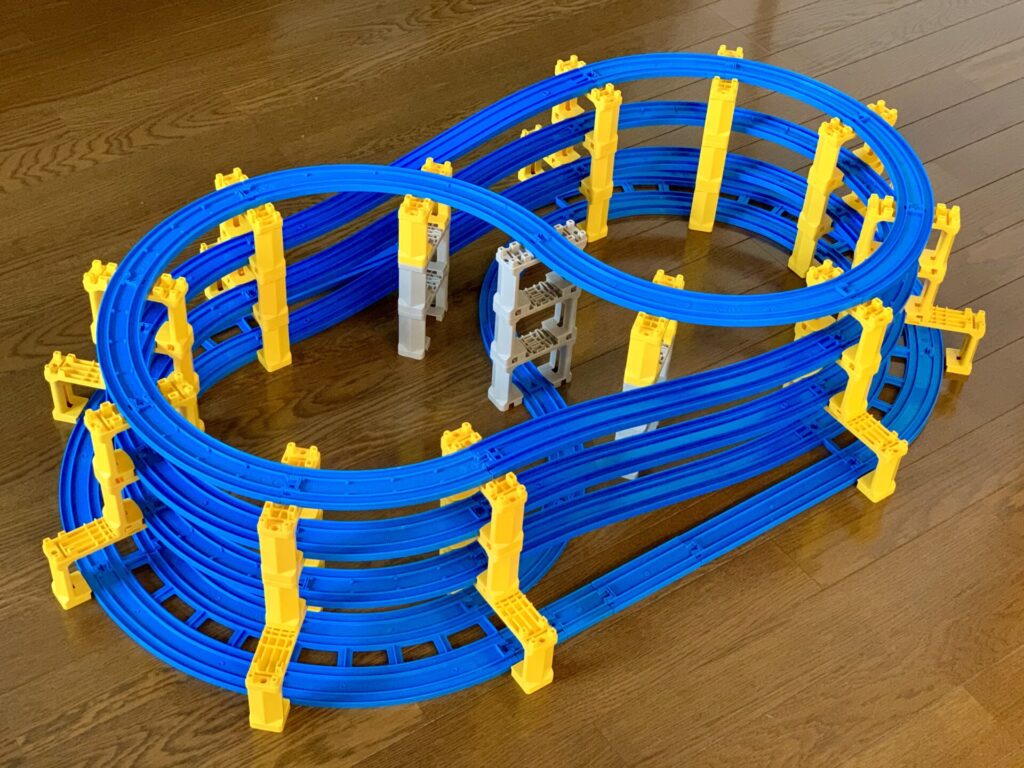
Two trains run side by side and pass each other.
いかがでしたか?
大人なレイアウトですが、親子でつくるのも楽しいですね。
Would you like it?
It’s kind of adult’s track layout, but should be fun for parent and child to build it together!